Pages

Search This Blog

Showing posts with label Tutorials. Show all posts

Thursday, May 16, 2013

Converting a shared mailbox to user mailbox [ Exchange 2013 & Office365 ]

Recently I was working on a migration from on-premises Exchange 2010 servers to Office365 . As Office365 is based on Exchange 2013 I decided to created the multi-accessed mailboxes as a shared mailboxes rather than user mailboxes.

After a while a request was raised requesting changing one of the shared mailboxes to a user mailbox ( as it will be used for an authenticated application )

The conversion is doable using PowerShell , as follow :

  • Connect to Office365 using remote PowerShell using the following steps
    • Store your Office365 credentials , as follow

$Office365Cred=Get-Credentials

    • At the credentials popup enter your credentials and hit Enter
    • Create a remote session using the following PowerShell cmdlet

$Office365Session = New-PSSession -ConfigurationName Microsoft.Exchange -ConnectionUri https://ps.outlook.com/powershell -Credential $Office365Cred -Authentication Basic –AllowRedirection

Sunday, March 17, 2013

“Sent Items Management” feature for Exchange 2010 SP3

As Exchange team released Exchange 2010 SP3 which was majorly released to allow Exchange 2010 to be installed on the latest Windows Server edition – Windows Server 2012 and also to allow coexistence with Exchange 2013 . In addition , it adds what is called Sent Items Management feature .

In this post I will explain what this feature was created to do and how to use it . let’s consider that we have User1, User2 and User3; for User2Send on behalf right was granted on User1's mailbox while for User3  “Send as right was granted on the same mailbox ( User1’s mailbox )  

The situation prior Exchange 2010 SP3 :

If User2/User3 used his/her right on User1’s mailbox the sent message will be kept on at their mailbox’s sent items folder and none of those message will be saved at User1’s mailbox.

Wednesday, February 20, 2013

Controlling the database path/location for Exchange 2013 database

As Exchange 2013 comes with the new management paradigm Exchange Administration Center ( EAC ) which is a web based management interface some of the basic functions were found to be missing. One of the missing functions is the ability to relocate ( move ) mailbox database(s) and log files via the console !

In order to overcome this there are some tips that will help you in minimizing the need of moving the databases of your Exchange 2013 servers , as below :

- Use the command line for installing the mailbox servers to control the name and the path of the initial server’s mailbox database by using /MdbName , /DbFilePath and /LogFolderPath switches :

Setup.exe /Mode:Install /IAcceptExchangeServerLicenseTerms /Roles:Mailbox /MdbName:MBDB-01 /DbFilePath:”D:\Exchange Databases/MBDB-01/MBDB-01.edb” /LogFolderPath:”L:\Exchange Logs
image

Once completed both database and logs will be at the assigned within the installation paths .


Friday, February 15, 2013

Creating a shared mailbox using Exchange 2013 Exchange Admin Center ( EAC )

Creating of a mailbox that allows multiple users to monitor and reply to email sent to its email address (for example, an address used specifically by the help desk) is a common tasks for each organization .

For old Exchange version such accounts were created as normal mailboxes then the required permissions are granted to all recipient that require access to these mailboxes . With Exchange 2013 things changed ! as a dedicated new recipient type – namely shared was added to the allowed to be created recipients which facilitates creation of such accounts ( mailboxes ) .

In this post I will show how you can create a shared mailbox and assign the required access levels to it .

First of all , login to the Exchange Admin Center and navigate to the Recipients from the left side menu , choose Shared from the available options then click + to start with a new shared mailbox creation :

image

Wednesday, September 26, 2012

OMG !! Store.exe is memory insatiable

Few days ago , I was working with one of our customers for a minor support incident ; while working he informed that the performance of the server is low so he checked the status from Task Manager and noticed that Store.exe process is consuming around 11 GB of server’s memory !!

image

I advised him that for Exchange It is absolutely normal for Store.exe to grab as much RAM on the server as it can possibly get – as long as Store thinks it needs it to optimize performance. Store was written to do so. It does this as it wants to do as much stuff in memory as possible, without having to go to the slow page file ( A default behavior since Exchange 5.5 ) and hence , this is a feature, not a bug . Exchange will use as much memory as it can for store.exe to optimize performance, another service runs and need some of the RAM itself then exchange will release some. ( You can read more about this here )

The default amount of consumed memory ( cache ) by Store.exe for Exchange 2010 mailbox server are listed below ( With my customer case highlighted ) :

Server physical memory (RAM)

Database cache size: (Mailbox role only)

Database cache size: Multiple-role (for example, Mailbox + Hub Transport)

2 GB

512 MB

Not supported

4 GB

1 GB

Not supported

8 GB

3.6 GB

2 GB

16 GB

10.4 GB

8 GB

24 GB

17.6 GB

14 GB

32 GB

24.4 GB

20 GB

48 GB

39.2 GB

32 GB

64 GB

53.6 GB

44 GB

96 GB

82.4 GB

68 GB

128 GB

111.2 GB

92 GB

You can read more about Mailbox database cache and its enhancements with Exchange 2010 Here

Wednesday, September 19, 2012

Utilizing the power of Active Directory module for PowerShell to accomplish tasks fast and easy

I was working with a customer , who requested for an easy way to do the following two tasks :

  1. Identify all the installed operating system versions and their current service packs for all computers in his company’s Active Directory Domain.
  2. List all disabled computers accounts all over the domain and move them to a designed OU for review prior deletion

As his Active Directory is hosted by Windows Server 2008 R2 domain controllers I advised him to utilize the capabilities of Windows PowerShell with Active Directory module , as follow :

First of all , let’s list all available modules for Windows PowerShell , then import the one for Active Directory by executing the following commands at an elevated Windows PowerShell window :

Get-Module –ListAvailable

Import-Module ActiveDirectory

image

Wednesday, September 12, 2012

Windows Server roles and features duplication on multiple servers using PowerShell

In the process of servers preparation you may have multiple servers which will play the same role and thus require installation of the same Windows Server role(s) , role service(s) and feature(s) .

Most of admins do it the hardest way , by installing the role(s) , role service(s) and feature(s) names(s) for each server using Server Manager Sad smile.

An alternative way to be used is to install all required role(s) , role service(s) and feature(s) on a single server , export it to .XML file and then use the exported file to automate installation of the remaining servers .

Here is how to do :

  • Source Server Preparation : Install the required role(s) , role service(s) and feature(s) normally on one server using the traditional way ( Server Manager )
  • Once installation is completed , start an elevated Windows PowerShell Modules

image

Saturday, September 8, 2012

Reset domain Administrator account password using only your Windows installation media !

Do you know that you can reset your Active Directory Administrator account password without login into your Active Directory ? . In this post , I will explain in a step by step mode how you can do this using only  your Windows installation media which can be used to reset the Administrator account password if forgotten and you have no other user(s) with privilege(s) to do the reset.

For this tutorial I will use a virtualized domain controller with Windows Server 2008 R2 with SP1 as Operating System.

Here is the detailed procedure :

  • Mount Windows Server 2008 R2 ISO/DVD 

image

  • Restart your domain controller and choose to boot from DVD when prompted

SNAGHTML6e0178

  • At “Install Windows”  click next

SNAGHTML6f3a24[4]

Friday, September 7, 2012

How to find the current Exchange Server Schema Version

In a previous post I showed how to determine the current version of Schema version for Active Directory for this one I will show how to determine the Schema version for Exchange server.

In contrary to Active Directory , installing of a higher in service pack within the same edition can cause schema version change , as you can see below ( I added Forest ObjectVersion and Domain ObjectVersion as a bounce ) :

Exchange edition

Schema version

Forest objectVersion attribute of Organization container

Domain objectVersion attribute on Microsoft Exchange System Objects

Exchange 2000 RTM

4397

-

4406

Exchange 2000 SP3

4406

-

4406

Exchange 2003 RTM

6870

6903

6936

Exchange 2003 SP1

6870

6903

6936

Exchange 2003 SP2

6870

6903

6936

Exchange 2007 RTM

10628

10666

10628

Exchange 2007 SP1

11116

11221

11221

Exchange 2007 SP2

14622

11222

11221

Exchange 2007 SP3

14625

11222

11221

Exchange 2010 RTM

14622

12640

12639

Exchange 2010 SP1

14726

13214

13040

Exchange 2010 SP2

14732

14247

13040

Now , here are how to find your current Exchange Schema version ( for all , replace data in italic with yours )

Tuesday, September 4, 2012

How to find the current Active Directory Schema Version

The schema contains formal definitions of every object class that can be created in an Active Directory forest. The schema also contains formal definitions of every attribute that can or must exist in an Active Directory object.

During Domain Controllers upgrade , a mandatory step which is Schema extending must take place which changes ( increases ) the number of Schema version.

In this post I will show all the possible ways – according to my knowledge – by which you can identify your current Active Directory Schema version.

First of all , here is a list for Schema versions relative to Windows editions :

Windows Edition

Schema Version

Windows 2000 RTM with all Service packs

13

Windows Server 2003 RTM with all Service packs

30

Windows Server 2003 R2 RTM with all Service packs

31

Windows Server 2008 RTM with all Service packs

44

Windows Server 2008 R2 RTM with all Service packs

47

Windows Server 2012 RC

56

Now , here are how to find your current Active Directory Schema version ( for all , replace data in italic with yours )

  • Using GUI : by using either ADSIEdit / LDP.exe , navigate to :

      "CN=Schema,CN=Configuration,DC=itguydiaries,DC=net"

imageimage

Thursday, August 30, 2012

DHCP resiliency with Windows Server 2012 ; Awesome !!

DHCP is designed to reduce the administration burden and complexity of configuring hosts on a TCP/IP-based network, such as a private intranet. Using the DHCP Server service, the process of configuring TCP/IP on DHCP clients is automatic .

Windows Server 2008 R2 provided two mechanisms for DHCP server role resiliency , as follow :

DHCP in a Windows failover cluster. This option places the DHCP server in a cluster with an additional server configured with the DHCP service that assumes the load if the primary DHCP server fails. The clustering deployment option uses a single shared storage. This makes the storage a single point of failure (SPoF), and requires additional investment in redundancy for storage. In addition, clustering involves relatively complex setup and maintenance.

Split scope DHCP. Split scope DHCP uses two independent DHCP servers that share responsibility for a scope. Typically 70% of the addresses in the scope are assigned to the primary server and the remaining 30% are assigned to the backup server. If clients cannot reach the primary server then they can get an IP configuration from the secondary server. Split scope deployment does not provide IP address continuity and is unusable in scenarios where the scope is already running at high utilization of address space, which is very common with Internet Protocol version 4 (IPv4).

Tuesday, August 21, 2012

Manual registration of Office 2010 Filter Pack ( IFilters ) post Exchange 2010 SP1 | SP2 installation

Exchange Search uses IFilters to index text content in different file formats. Microsoft Office 2010 Filter Packs includes filters for Microsoft Office 2010 and Office 2007 file formats. Installation of the Filter Pack is a pre-requisite for Exchange 2010 Mailbox and Hub Transport servers.

The following file name extensions are supported by the filter pack :

.docm, .docx, .one, .pptm, .pptx, .vdx, .vsd, .vss, .vst, .vsx, .vtx, .xlsb, .xlsm, .xlsx, .zip

After you install the Filter Pack, the included IFilters are registered with Windows Search. To allow Exchange 2010 to index Office 2010 file formats, the IFilters must also be registered with Exchange Search. This is done by modifying the registry.

With Exchange 2010 RTM , you must register the IFilters from Office 2010 Filter Packs manually , post Exchange 2010 RTM installation .

In Exchange 2010 SP1 & SP2 , Exchange Setup registers the IFilters from Office 2010 Filter Packs with Exchange Search. But what if you installed your Exchange 2010 SP1 | SP2 server and forgot do to installation of Office 2010 Filter Packs ? ( Unattended installation will proceed even if it isn’t installed )

image

Friday, August 17, 2012

Enable expired password change feature in Outlook Web App

One of the enhancements that was introduced with Exchange 2010 SP1 and Exchange 2007 SP3 is the ability to change expired passwords using OWA .

This feature is disabled by default ! . You can enable and start use this feature by creating a registry value on all Client Access Servers ( CASs ) within your Exchange organization ; the value have the following settings :

Adding of this value can be simplified by executing the following command at an elevated command line :

Reg Add “HKLM\System\CurrentControlSet\Services\MSExchange OWA” /V ChangeExpiredPasswordEnabled /t Reg_DWORD /d 1

image

Monday, August 13, 2012

Lync client credential popup due to missing of Kerberos Account Assignment

One of the common issues with Lync client is the credentials popup that appears for multiple reasons , one of the causes is due to faulty Kerberos configuration for Lync Web Services that keeps asking users to enter his / her credentials repeatedly even if the correct data was given . In this post I will show how to identify existence of the issue and how to fix it .

Identifying Lync Kerberos issue

In order to validate Lync Web Services Kerberos functionality we will utilize the following PowerShell cmdlet  :

Test-CsKerberosAccountAssignment –Identity “Site:IT Guy Corp.” –Verbose

If the account are not in place, you will get an error message like below :

image

* If you need to identify your site name , simply execute Get-CsSite at Lync Management Shell ( LMS )


Friday, August 10, 2012

Monitor Group Membership Changes in a real-time manner

One of the common security issues for IT admins is monitoring Active Directory groups memberships , so a notification is raised for each time a member is added to a group .

Most of admins assume that an expensive monitoring system must be in place in order to accomplish this task , fortunately this is a wrong  assumptions . All you need is the following  :

Enable account management audit :

  • On a domain controller open Start > Administrative Tools > Group Policy Management
  • Create a new Group Policy Object ( GPO ) linked to domain controllers OU with a descriptive name [ For my lab I named it Audit Account Management ]

image

  • Edit the newly created GPO as follow : Computer Configuration > Policies > Windows Settings > Security Settings > Local Policies > Audit Policy , then set enable for Audit account management at least for success 

image

Friday, July 20, 2012

Preparing Windows Server 2008 R2 with Service Pack 1 for Exchange 2013 Preview installation

As I showed in earlier post how you can install Exchange 2013 Preview on Windows Server 2012 Release Candidate , I will show in this one how you can prepare for its installation on Windows Server 2008 R2 with SP1 after which you can proceed with installation as shown here

As you may guessed that installation with Windows Server 2008 R2 SP1 will involved more preparation rather with Windows Server 2012 due to required of some pre-installation patching which already done for Windows server 2012 .

Microsoft introduced Exchange 2013 Preview in a two roles only architecture ( Client Access Server and Mailbox Server ) which can be either installed in combination on a single box or separated each on its dedicated box.

Wednesday, July 11, 2012

Converting Windows Server 2012 from a Server Core to a Full Server ( with GUI ) and vice versa

Windows Server 2012 comes in both Core & Full ( with GUI ) flavors as its successor Windows Server 2008 . A great enhancement that comes with Windows Server 2012 is the ability to convert from one to the other . In this post I demonstrate how to perform these conversions.

From Windows Server 2012 Core to Windows Server 2012 Full ( with GUI ) :

At Windows Server 2012 Core edition CMD perform the following steps :

1 ) Create a directory to which Windows image will be mounted :

MkDir C:\MountDir

image

2 ) Determine the index number for a Server with a GUI image ( Mine is DataCenter )

Dism /get-wiminfo /wimfile:<drive>:sources\install.wim

image

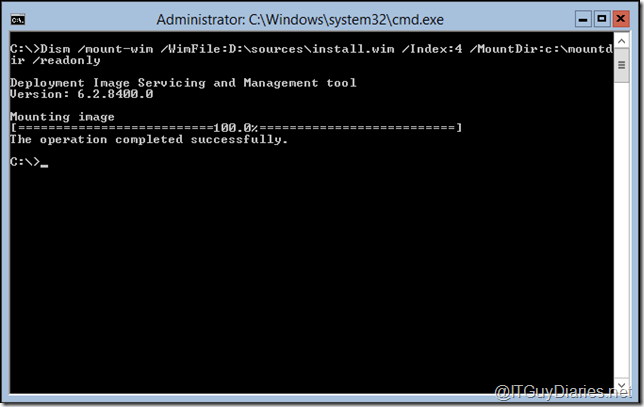
3 ) Mount the WIM file using this command at an elevated command prompt ( D:\ refers to my Windows Server 2012 DVD ) :

Dism /mountwim /WimFile:<drive>:\sources\install.wim /Index:<#_from_previous_step> /MountDir:c:\mountdir /readonly

image

4 ) Finally , from CMD start Windows PowerShell , then execute the following cmdlet :

PowerShell ( Enter )

Install-WindowsFeature Server-Gui-Mgmt-Infra,Server-Gui-Shell –Restart –Source C:\mountdir\windows\winsxs

image

image

image

image

Once completed , automatic restart will be performed , the magic spell works and our Windows Server 2012 is with GUI Open-mouthed smile

From Windows Server 2012 Full ( with GUI ) to Windows Server 2012 Core :

This is a single step action , all you need is to execute the following cmdlet at an elevated Windows PowerShell window :

 Uninstall-WindowsFeature Server-Gui-Mgmt-Infra –restart

image image

Once completed , automatic restart will be performed , the magic spell works and our Windows Server 2012 is Core Open-mouthed smile

In addition , here are the steps for installation for a Windows Server 2012 Core flavor :

SNAGHTMLd8a2c15

SNAGHTMLd8a7333

SNAGHTMLd8a9f51

SNAGHTMLd8ac8c1

SNAGHTMLd8ae93c

SNAGHTMLd8b087f

SNAGHTMLd9b0ed6 SNAGHTMLd9b7bbb SNAGHTMLd9e632c

If you want to install Windows Server 2012 with GUI chose the other option at the third screenshot ( count from left ) . awesome , isn’t ? Winking smile

Monday, July 9, 2012

RBAC mess after recovering my deleted Exchange 2010 security groups !!

Just after I recovered my accidently deleted Microsoft Exchange security groups , I noticed that for Exchange Management Console ( EMC ) and Exchange Management Shell ( EMS  ) the available to-be-performed tasks are not matched with my assigned Exchange role ( Organization Management ) , see below :

image

image

Sunday, July 8, 2012

OMG !! Exchange Security Groups were deleted accidentally

I was working with one of our clients for an Exchange admins permission assignments when he came with a question “What will happened if Microsoft Exchange Security Groups were deleted for a running Exchange 2010 organization ? “ . My simple answer was “You can simply restore it from an Active Directory backup ; Or even better , using Active Directory Recycle Bin ( if previously implemented )”

But what if I have neither valid backup nor Active Directory recycle Bin is enabled ?”  He replied . Since I have never faced such issue, I decided to simulate it in a lab and here what I got .

On my lab , I went to Active Directory Users and Computers and deleted all Microsoft Exchange Security Groups

image

As you might know that those groups are created during the processing of Setup /PrepareAD command upon first Exchange server installation. So , I tried to execute Setup /PrepareAD again , when I got the following error : 

image

The error indicates that the failure was due to that OtherWellKnownObjects attribute on Microsoft Exchange container is pointing to an invalid DN or a deleted object.

Friday, July 6, 2012

Control allowed to connect ActiveSync devices using ActiveSync delegation

As more and more people uses their mobiles to access their Exchange mailboxes the need of controlling which devices are allowed to be connected arise .

In this post I will explain how you can set up ActiveSync approval delegation for your helpdesk team , so whenever any user tries to connect to his / her mailbox using ActiveSync an approval request will be is required prior allowing syncing of mailbox data.

First of all , create a new mail-enabled security group that will be responsible for receiving ActiveSync devices requests which can be done either using Exchange Management Console  [ EMC ] or using Exchange Management Shell  [ EMS ] , as follow :

New-DistributionGroup -Name "ActiveSync Approvers" -Type "Security" -OrganizationalUnit "itguydiaries.net/Security_Groups/" -SamAccountName "Exchange ActiveSync Approvers" -Alias "ExASapprovers"

Now , enable Exchange ActiveSync quarantine and configure the notification email :

Set-ActiveSyncOrganizationSettings –DefaultAccessLevel Quarantine –AdminMailRecipients ExASapprovers@itguydiaries.net